
- Basic information
- Managing references
- Managing citation styles
- Creating a bibliography
- Cite While You Write
Basic information
EndNote Web is a web-based application featuring basic reference management functions. It is free to use for everybody.
However, only a limited set of citation styles is available in EndNote Web. Therefore we recommend that WU students, staff and faculty use EndNote Web in addition to the EndNote 20 desktop program, with which it can be synchronized.
Instructions for EndNote 20 and the citation styles can be found here.
Setting up an account
Open the EndNote Web homepage and click on Create an account. Sign up using a valid email address and fill out the registration form.
After you have logged in, you can view your account or change your settings under the menu Options. Here you can change your password, email address, or language settings.
Managing references
Importing references

Some databases offer a direct export feature to export references into EndNote Web (e.g. EBSCO). If this feature is not available, most databases allow you to export references as a RIS file.
Take the following steps to import the resulting file:
- In the database, select the option Export as RIS file (sometimes called Export to EndNote) and save the file on your computer.
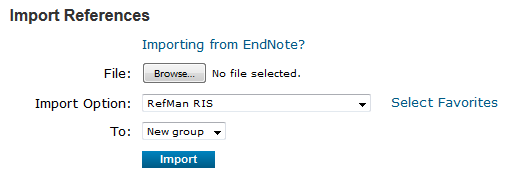
- In EndNote Web, go to Collect » Import References.
- Select the downloaded file.
- Select RefMan RIS from the dropdown Import Option menu.
- Select the group you want the reference imported into.
Creating references manually
- In EndNote Web, go to Collect » New Reference.
- Select the Reference Type: This will define which fields are available and how the citation and bibliographic entry will be formatted.
- Fill out the required bibliographic data. Please note the formal requirements for entering names.
Entering names
Names should be entered directory style, i.e. last name(s), first name(s), so that the program will know how to format them depending on the required context. Anything in front of the comma will be sorted as the last name, anything after the comma counts as the person’s first name or names. Aristocratic titles like von, van, or de are given as part of the first name:
- Judith Butler
Butler, Judith - Johann Matthias von der Schulenburg
Schulenburg, Johann Matthias von der
Suffixes found at the end of a name must be listed after a second comma:
- George Bush Sr.
Bush, George, Sr.
The names of organizations, companies, etc. are listed with a comma at the end:
- International Monetary Fund
International Monetary Fund,
If an institution’s name includes one or more commas, insert a second comma immediately after the first and leave off the closing one:
- Ministerium für Wissenschaft, Forschung und Wirtschaft
Ministerium für Wissenschaft,, Forschung und Wirtschaft
Entering multiple authors
Multiple authors of the same work are entered in the same entry field. Each author is entered on a separate line:

Managing groups
To sort your references, EndNote Web allows you to create groups: Under Organize » Manage My Groups you can create groups and share them with other users.
You can add references to a group under My References by checking the box by the entry and selecting “Add to … Group. References can be added to multiple groups.
Managing citation styles
WU citation styles
The WU citation styles are not available in EndNote Web. However, all WU members have access to the desktop version, EndNote 20, where WU citation styles can also be selected. A guide to EndNote 20 and the citation styles can be found here.
Other citation styles
To create bibliographies and work with the Cite While You Write plug-in, you first need to select a citation style:
Go to Format » Bibliography and add the citation styles you need.

Creating a bibliography
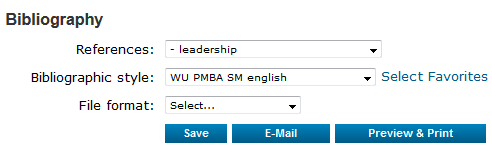
If you are not using the Cite While You Write plug-in, you can go to Format » Bibliography to create a bibliography in RTF format that you can use in your work:
- Select the references you want to include in your bibliography (a group, a quick list, etc.).
- Select a citation style as a template.
- Select RTF (rich text file) as your file format.
- Click Save.
Cite While You Write
The Cite While You Write (CWYW) is a plug-in for use with MS Word in Windows and Mac OS X. With this plug-in, you can insert and format references from EndNote Web and automatically create a bibliography.
Installation and set-up
- Go to your EndNote Web account, select the appropriate installer for your operating system under Options » Download Installers and install it on your computer.
- Open MS Word and go to Endnote » Preferences.
- Enter your login data for EndNote Web under Application.
Select a citation style
Choose your preferred citation style under Style. Only the styles that you have already added to your favorites in EndNote Web will be available.
Insert a citation
- In your text, place the cursor where you want to insert your citation.
- Click on Insert Citations in the EndNote toolbar.
- Enter the author or title of your reference in the search window. You can restrict your results to the year of publication, as well.
- Double-click on the reference you want to insert. It will also automatically be added to the bibliography at the end of your paper.
Insert a citation as a footnote
- Insert a footnote.
- Place your cursor in the footnote and proceed as described in steps 3 and 4 above.
Editing and deleting citations
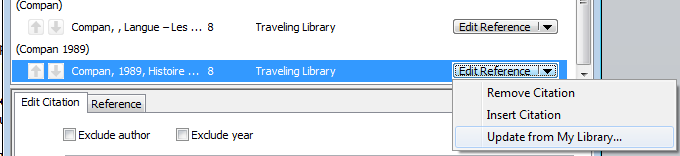
To add page numbers or prefixes like cf., see, etc., right click on the citation and select Edit Citations » More. In the editing window under Edit Citation you can then add the additional data.
Deleting references
If you want to delete a reference from the text, do not just use the delete key on your keyboard, as this could create problems with your bibliography. Right click on the reference and select Edit Citations » More. Click the citation you want to delete under Edit Reference » Remove Citation and then click OK.
Updating references
When you have edited a reference in EndNote Web, changes are not automatically implemented in your Word document. To make these changes, you have to select Update from My Library in the Edit Reference window of the appropriate reference. Complete the process by clicking Insert.
Inserting secondary quotations
Please note: Generally, secondary quotations are best avoided in academic writing and should only be used if it is impossible to obtain the original source.
EndNote doesn’t offer the option to automatically insert secondary quotations. If both the original and the secondary source should appear in the bibliography, it gets a bit tricky:
- Insert both citations (original and secondary) with EndNote Web so that both appear in the bibliography.
- Write the citations as regular text next to them in the desired format.
- Hide the EndNote Web citations by selecting them and using the font formatting menu (CTRL+D or right-click » Font) to check “Hidden.” You can still see the citations while editing, but they won’t be visible in print or when exporting to PDF.