
- Basic information
- Workshops & guides
- Managing references
- Link resolver – your connection to the WU catalog
- Using Citavi in Word
- Further information
Basic information
WU has a campus-wide license for the reference management software Citavi, making it available to all WU students, faculty, and staff free of charge.
Citavi and library computers
Please note: Citavi isn’t installed on the computers in the WU library. If you want to work with Citavi during your visit to the library, please bring your own computer.
Citavi is only compatible with the Windows operating system. If you want to use it with a Mac OS X system you will need to set up a virtual Windows environment, for example with Parallels or VirtualBox.
Obtaining license data
To be eligible to use the WU license, you need to sign up in the appropriate category with your WU email address here. You will then be sent an email with the license information.
Please note: The data provided during registration are processed outside of the European Economic Area (EEA) by QSR International. You can find further information on this here.
Installation
Download the software from the official Citavi website and install it on your Windows-based PC. Supply the required license information as specified in the email you were sent.
Information for WU staff
To install Citavi on WU work computers, please download the program via the Software Center in the start menu.
Workshops & guides
Library workshops
The WU Library regularly offers introductory courses for Citavi and other reference management software. You can find the current schedule on our website.
search_bar
In addition, every Tuesday you have the opportunity to visit the search_bar – no registration necessary! The search_bar offers advice on all questions concerning reference management.
Guides
Below you can find an overview of the most important functions and WU-specific settings.
Managing references
Creating references manually
- Click on the Add new reference button
- Select the document type: This will define which fields are available and how the citation and bibliographic entry will be formatted.
- Fill out the required bibliographic data. Please note the formal requirements for entering proper names.
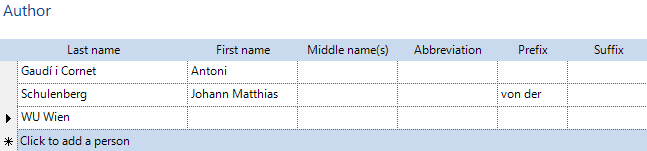
Entering names
Names should be entered directory style, i.e. last name(s), first name(s), so that the program will know how to format them depending on the required context. For more complex names, click on the blue hyperlinked text Author. A window will open with spaces for the different components of the author’s name. Names of institutions are entered entirely in the space for the last name.
Entering chapters in edited volumes
To enter a chapter from an edited volume, first create an entry for the entire volume under Book, edited. Then, click on Add contribution and enter the information of the chapter you wish to add.
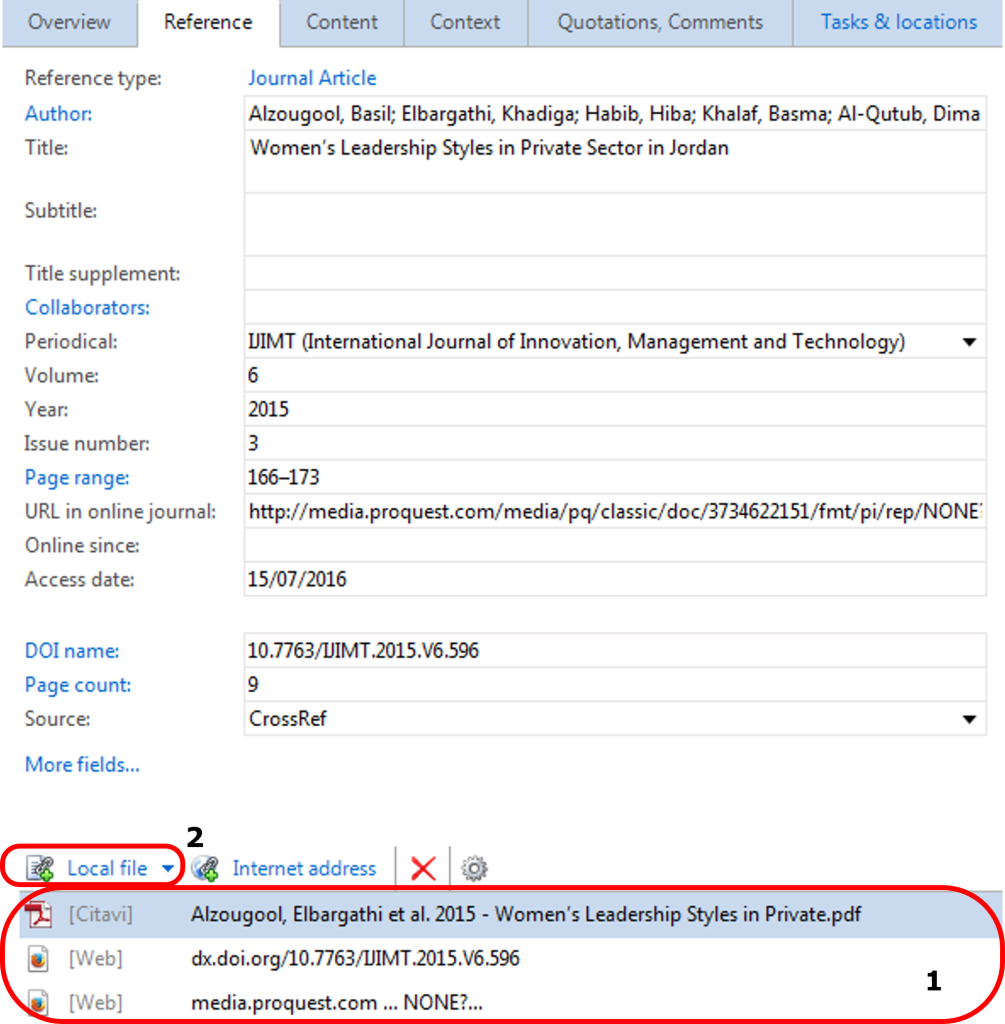
Attaching files
You can attach files to each individual entry. You can either drag and drop your file into the footer of the Citavi title page (1) or browse and select files by clicking Local file (2).
Sorting references
Citavi offers several different options for organizing your references: You can assign keywords to each entry in your literature database and assign entries to categories and groups. To do so, click on the Context tab.
Keywords are individual words or short phrases used to describe the contents of each element.
Categories are used to group elements that you feel belong together thematically. This could be for example because they all appear in a particular chapter of your work.
The third option, groups, is for elements that are not necessarily thematically related but belong together for other, more general reasons. For example, you can make a group of references that you want to delete, or references that you consider particularly important. Groups are not available for use in Word.
Searching by ISBN, DOI or PMID
Citavi allows you to search for literature references by a pre-existing numeric identifier (ISBN, DOI, or PMID) and import them directly into your database. Click on the symbol of the magic wand (ISBN, DOI, PMID) ![]() in the Citavi toolbar, enter the identifier, click Add then import the title into your project by clicking Add to project.
in the Citavi toolbar, enter the identifier, click Add then import the title into your project by clicking Add to project.
Importing references
Most databases offer a number of different export options, and Citavi is compatible with several file formats. In most cases the formats RIS or BibTeX are available, both of which can be opened directly with Citavi or imported using File » Import… » Text file.
Using Citavi Picker
Citavi Picker is a browser plug-in that automatically recognizes ISBN and DOI numbers and marks them with a Citavi symbol . Click on the symbol to import the reference into your literature database.
Another feature of the plug-in (Hunter) automatically recognizes the metadata embedded in web pages. When it has identified metadata, it will show a message at the bottom of the page with a menu where you can select the titles you want to import.

Knowledge Organizer
Citavi allows users to not only manage bibliographic data but also to collect citations, comments, etc., for each entry and makes them available in Word. Click the tab marked Quotations, Comments to add different types of quotes, your own comments, or a summary of the reference information.
If you have attached a PDF file to a reference entry, you can mark text passages in the Citavi PDF viewer and add the marked text as a quotation, summary, or comment. You can also mark images and add them as image citations.
Managing citation styles
Citation styles determine how citations in the text and the bibliography are formatted. Citavi offers a large choice of different styles that can be selected and downloaded if necessary under the menu Citation » Citation style.
If you have a citation style form an external source, save the .ccs file on your computer under My Documents\Citavi 5\Custom Citation Styles. The next time you open Citavi, it will be included in the list of available citation styles. If the style you need is not available, please contact the library at library@wu.ac.at.
Link resolver – your connection to the WU catalog
Once you have the title data of a document in Citavi, you can use a link resolver to check if the document itself is available to you through the WU library.
Setting up the link resolver
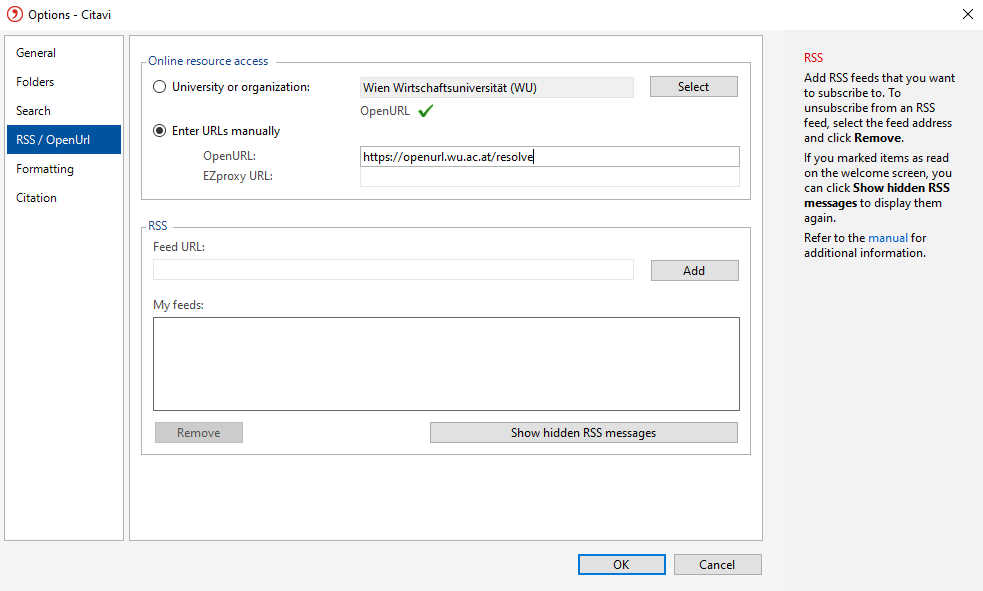
- In Citavi, click on the Tools menu, then select Options.
- A new dialog box will appear. On the left, choose RSS / OpenUrl. Enter the URL https://openurl.wu.ac.at/resolve in the OpenURL field (or select Wien Wirtschaftsuniversität (WU) in the field University or organization in Citavi 6). Confirm your entry by clicking OK.
Using the link resolver in Citavi
- Click on a record in your collection.
- Then, from the References menu, select Check Availability with OpenURL…
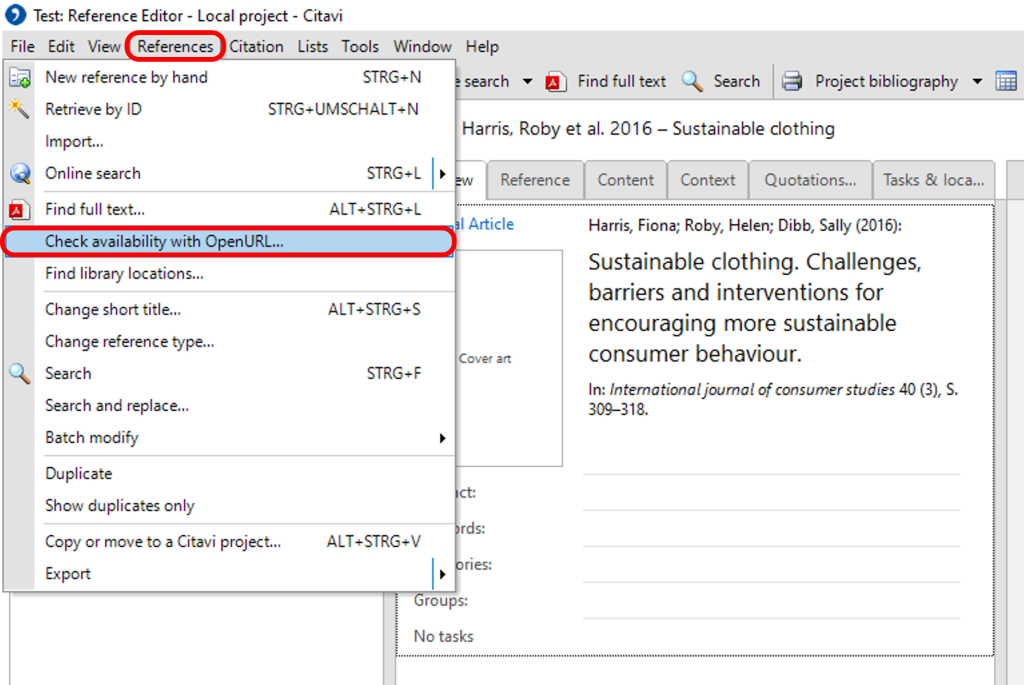
Citavi will open a browser window with the record’s page in the WU Catalog, allowing you to access the document directly, depending on its availability. To access a document online, you must be connected to the WU network. Details can be found here.
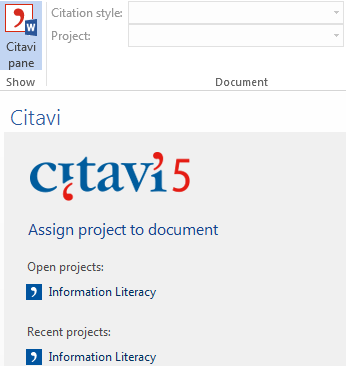
Using Citavi in Word
Citavi automatically installs the plug-ins for both Word and OpenOffice if it detects either of these programs on your PC. Click on Citavi in the menu bar to open the Citavi tab, then click on the Citavi pane symbol at the top left to open a menu that allows you to select a reference database (project) to assign to your document.
Once you have assigned a project database to your document, the Citavi panel will display information on the citations in your document and literature references in your project database.
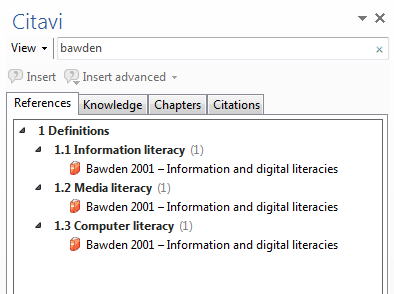
Inserting references
To insert a reference into your text, search for the name of the author or a word in the title in the Citavi panel. Double-click on the title to insert the reference where the cursor is located in your text. Citavi automatically adds the reference to the bibliography or literature list. If the selected citation style requires footnotes, then the footnote with the citation will be automatically inserted. Select the tab Citations to add additional details like prefixes (cf., see), page numbers, and suffixes (any text that should be displayed after the page number).
Inserting secondary quotations
Please note: Generally, secondary quotations are best avoided in academic writing and should only be used if it is impossible to obtain the original source.
Citavi can automatically format secondary quotations by taking the following steps:
- Enter a left parenthesis to open
- Insert the original quotation
- Right-click on the quotation and select Citavi » No parentheses
- Enter the text , as cited by
- Insert the secondary quotation
- Right-click on the quotation and select Citavi » No parentheses
- Enter the right parenthesis to close.
Inserting knowledge elements
Knowledge elements are handled similarly to references: Click on the tab Knowledge to see a list of quotations and comments, grouped by category. Double-click on a category to select this category as a chapter title. Double-clicking a quotation or comment automatically inserts it into your text, complete with the appropriate citation and bibliography entry. You will have to format the quotation appropriately, however (quotation marks, inset, italics, etc.).
Selecting a citation style
Go to Citation styles in the Citavi tab to select one of the styles available in Citavi.

Further information
For detailed step-by-step instructions, please visit the Citavi homepage. If you still have questions, we are happy to help you every Tuesday in the search_bar.